Splat Studio — User Guide
A complete walkthrough of everything Splat Studio can do. Splat Studio is a local
desktop GUI for @playcanvas/splat-transform:
convert gaussian-splat formats, bundle SOG, render images, generate collision
meshes, and edit splats — all with a live PlayCanvas 3D viewport.
The screenshots below are generated automatically from the running app against the built-in demo room splat (
npm run docs:capture), so they always match the current UI. The highlight boxes mark the controls each step refers to.
Contents
- The interface
- Projects & files
- Export: output formats & filters
- Generate: procedural .mjs generators
- Filters
- LOD: streamed multi-LOD
- Render: WebP image
- Analyze: summary statistics
- Edit: transform, measure & region
- Transform
- Region (crop / carve)
- Collision: voxels & mesh
- Viewport toolbar & Settings
- Scene hierarchy
- Camera view
- The 3D viewport
- Coordinate notes
- Updates
The interface
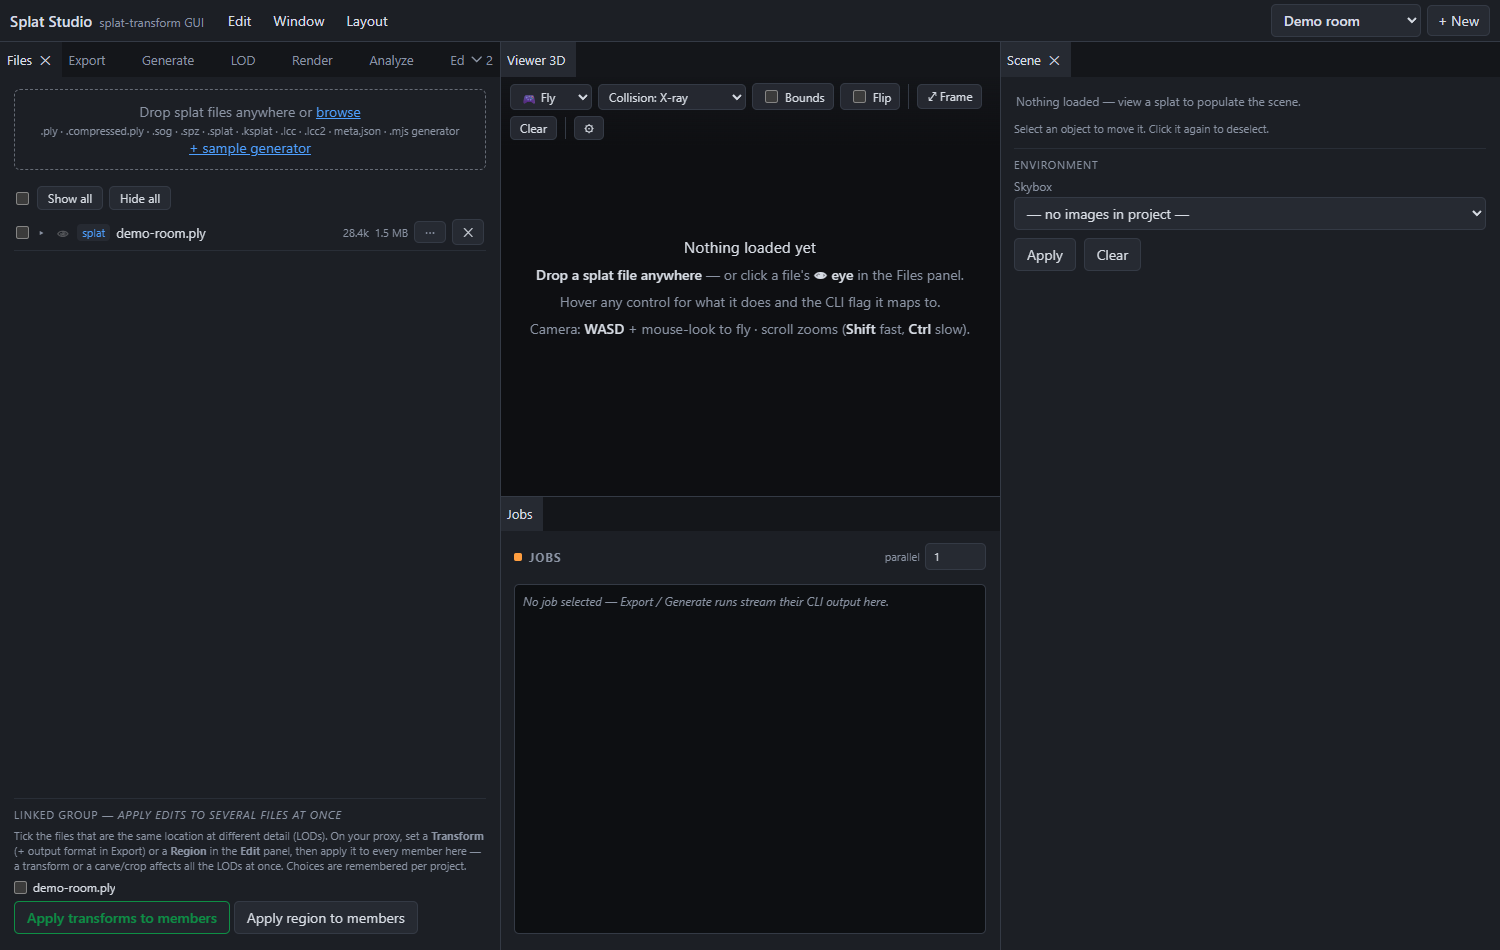
Splat Studio is a dockable tab editor (think Unity/Unreal). Every panel and the 3D viewport is a tab you can drag to re-dock, resize, float, close, and reopen.
- Top menu bar — the app title, the Window and Layout menus, and the project picker.
- Dock — the default layout puts the panel tabs (Files, Export, Generate, LOD, Render,
Analyze, Edit, Collision) on the left, the 3D viewport in the center, the Jobs panel
(the job queue + live
splat-transformoutput) below it, and Scene on the right. Drag any tab to rearrange; drag a tab out to float it in its own window. Settings opens as its own dialog (⚙ in the viewport toolbar, or Window ▸ Settings…). - Viewport — the live 3D view, with a toolbar along its top. The default camera is fly (mouse-look + WASD); scroll zooms (Shift fast, Ctrl slow). Switch to orbit from the toolbar.
Every control has a tooltip — hover to see what it does and which CLI flag it maps to.
Top menu
- Edit — Undo (
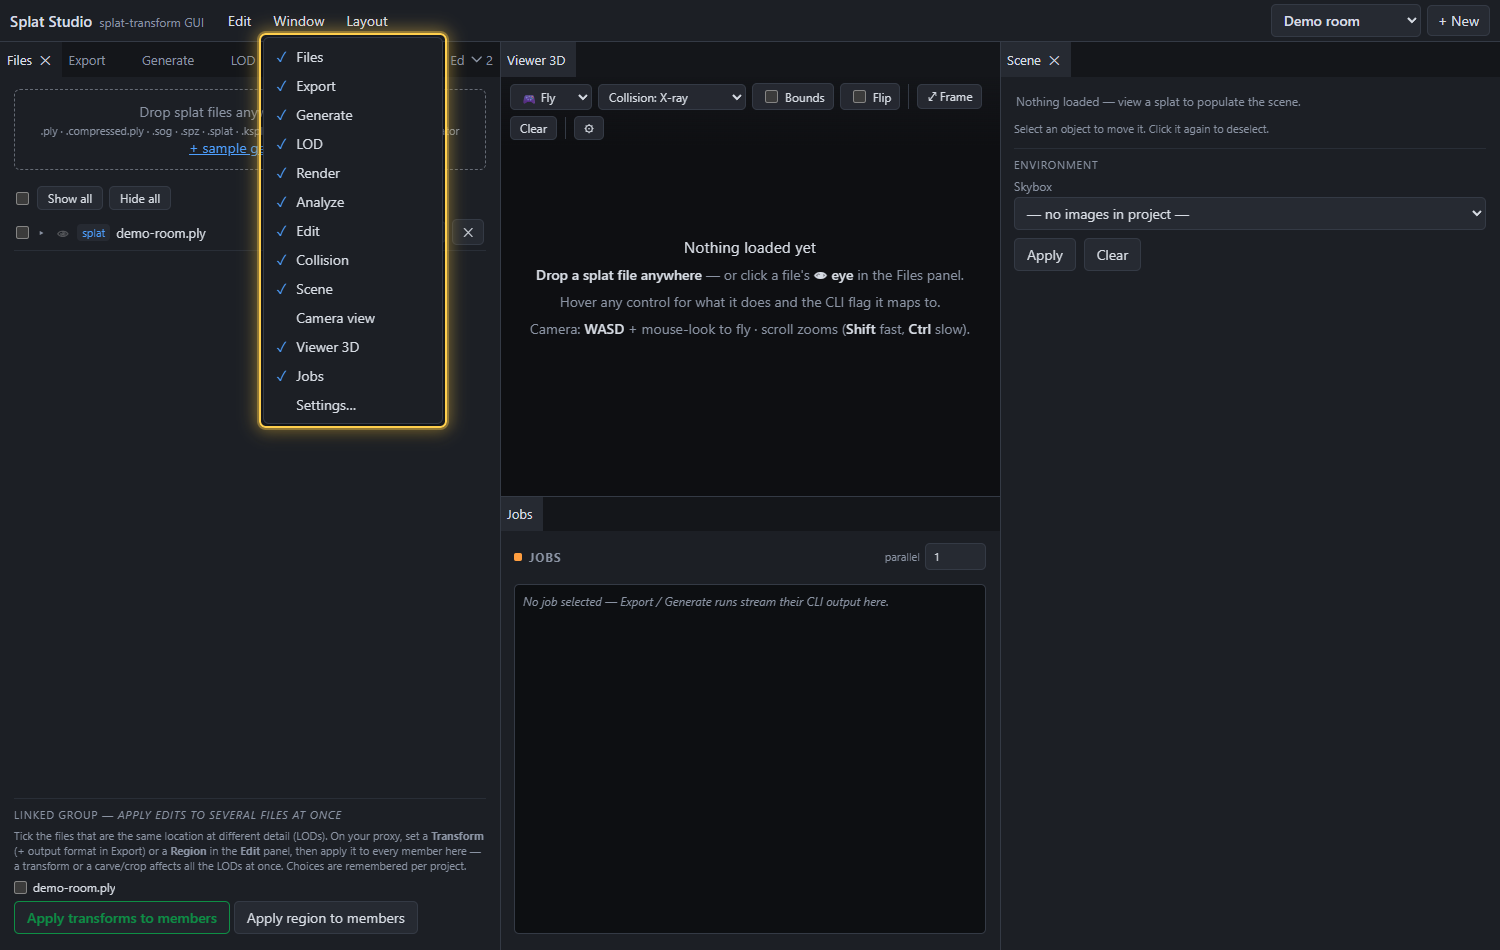
Ctrl+Z) and Redo (Ctrl+YorCtrl+Shift+Z) step through recent changes: panel settings, gizmo moves (a single drag is one step), layer visibility, and which splat is loaded. Native text-field undo still works while you're typing in a field. Running a job or deleting a file is not undoable (those write to disk), and the history resets when you switch projects. - Window — lists every panel with a checkmark for the ones that are open. Click to reopen a closed panel or close an open one. (The 3D Viewer and Jobs tabs can't be closed.) Settings… at the bottom opens the settings dialog.
- Layout — Reset to default restores the standard arrangement; Save layout checkpoints the current one. The layout is saved per workspace, so each workspace remembers its own arrangement.
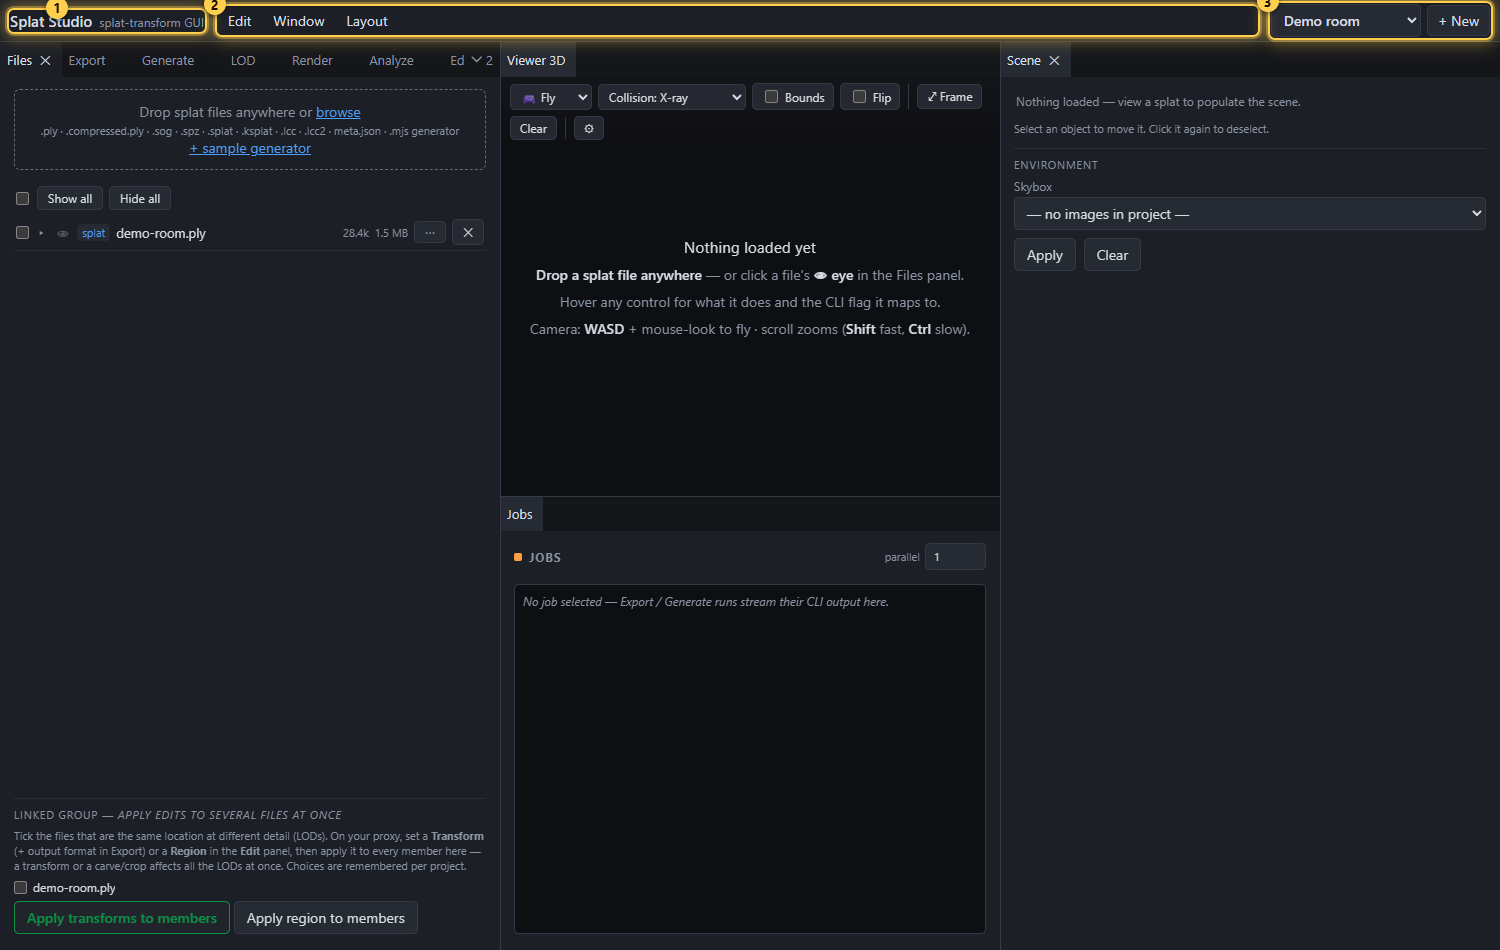
The top bar holds (1) the app title, (2) the menus, and (3) the project picker.
Projects & files
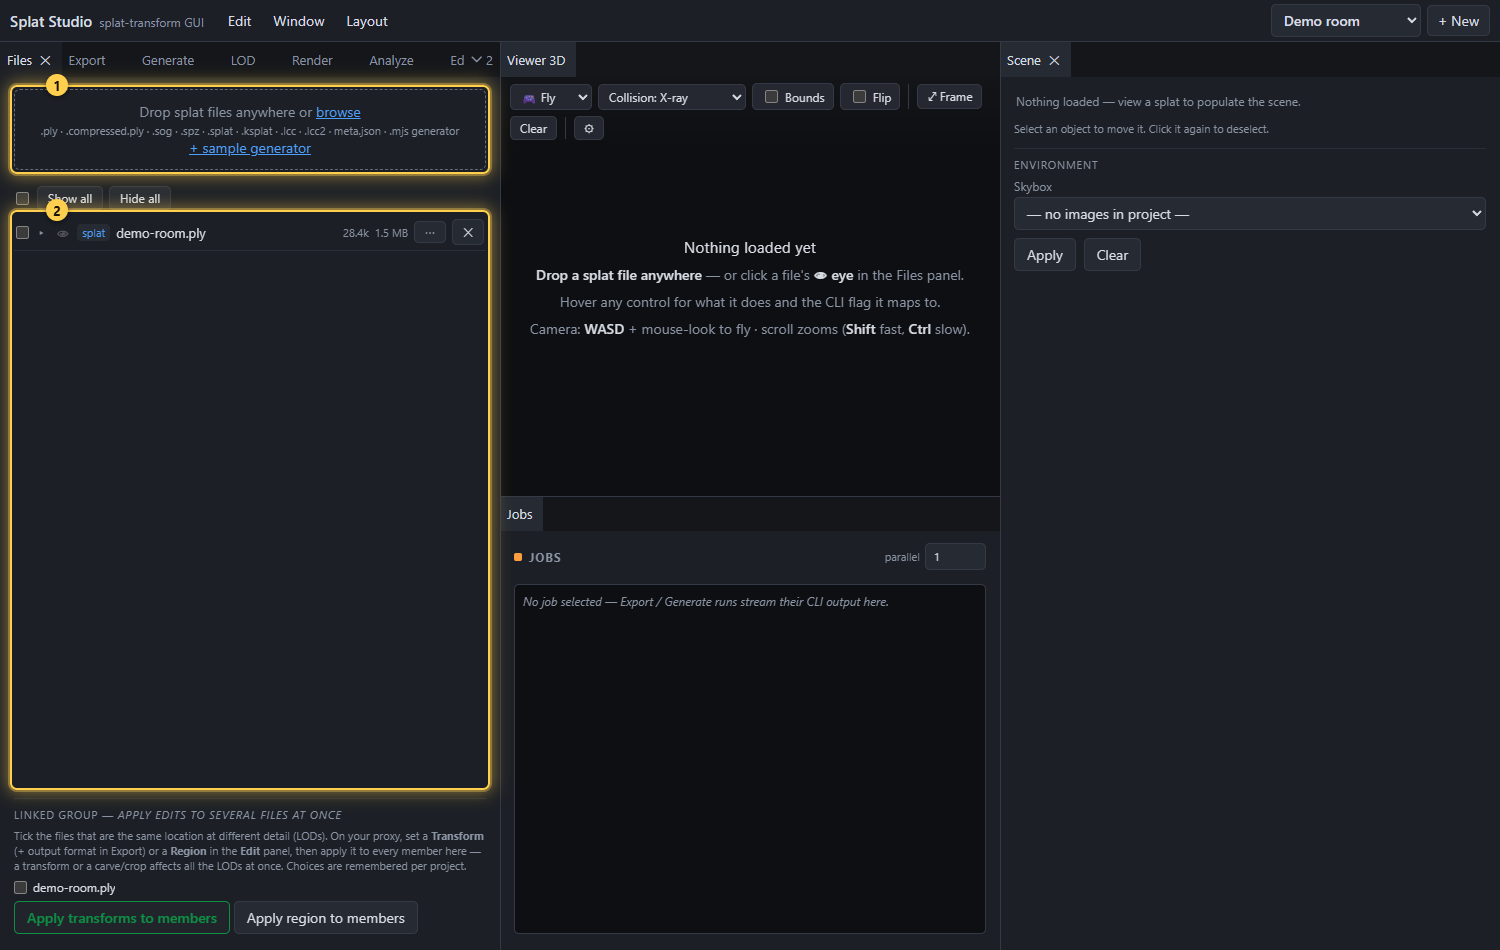
A project is a folder in your workspace; the dropdown in the top bar switches between them, and + New creates one. Everything is scoped to the active project.
To add splats:
- Drop files anywhere in the window, or click browse. Supported inputs:
.ply,.compressed.ply,.sog,.spz,.splat,.ksplat,.lcc,.lcc2,meta.json, and.mjsgenerators. -
The file list shows every source in the project, one row per file: checkbox · ▸ chevron · 👁 eye · kind tag · name · gaussian count · size · ⋯ · ✕.
-
The gaussian count is read straight from the file's own metadata — instant, no analysis run. Hover it for the exact number; on LOD bundles it breaks down per level. (Formats that don't store a readable count —
.ksplat,.lcc— omit it.) - The 👁 eye shows or hides the file in the viewport. Several splats (and streamed LOD bundles) can be shown at once: a bright eye is visible, a dim 🙈 is loaded but hidden (re-show is instant), a faint eye is not loaded yet. The most recently shown splat is the active one — the Edit / Analyze / Collision panels and the viewport HUD chip target it. Collision meshes and voxel octrees each have a single overlay slot, so showing one replaces the previous overlay.
- The ▸ chevron (splat and LOD rows) expands an inline details card: exact
gaussian count, size, modified date, kind, and full path. On streamed-LOD bundles
the card also shows the build recipe — a per-level table (level, source file,
keep %, gaussian count; the environment shell is flagged), the effective settings,
and the bake date + generator versions — read from the bundle's
build-meta.json(bundles baked before that file existed report "No build recipe" and list the per-level counts instead). - The checkbox selects the row for bulk actions; ✕ (click twice) deletes the file.
- The bar above the list holds the list-wide controls: a select-all checkbox (indeterminate when only some rows are ticked), Show all and Hide all (showing more than 20M new gaussians asks first — click again to confirm), and, while any rows are selected, the bulk actions: Show selected / Hide selected (same rules as Show/Hide all, selected files only), Add to linked group (ticks the selected splats in the Linked group below and saves), and Delete selected (click twice to confirm; removes every selected file).
- Right-click any file — or click its ⋯ button — for an actions menu of everything you can do with that file. The menu adapts to the file's type:
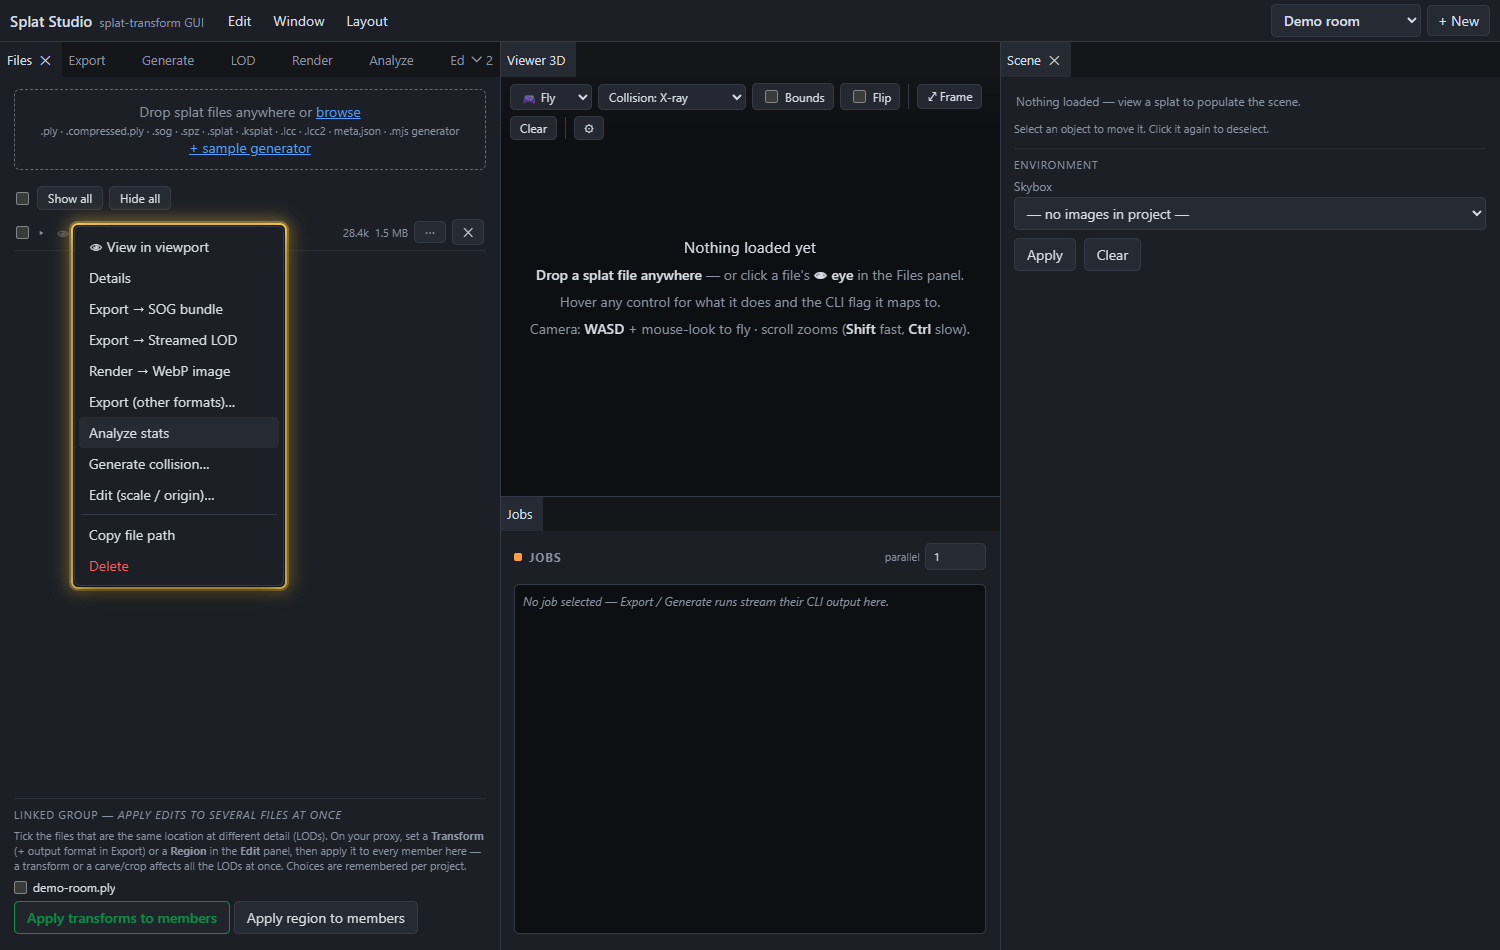
- View in viewport and Details (toggles the row's details card).
- Export → SOG bundle / Export as… — jumps to the Export panel with the file selected and the format preset; Export → Streamed LOD jumps to the LOD panel.
- Generate / Regenerate collision… — jumps to the Collision panel (the label tells you whether a collision mesh already sits next to the file).
- Analyze stats — runs the summary and shows the stats card.
- Edit (scale / origin)…, Generate & view (
.mjsgenerators), Copy file path, and Delete. - + sample generator drops a ready-to-run
.mjsscene generator into the project — run it from the Generate tab.
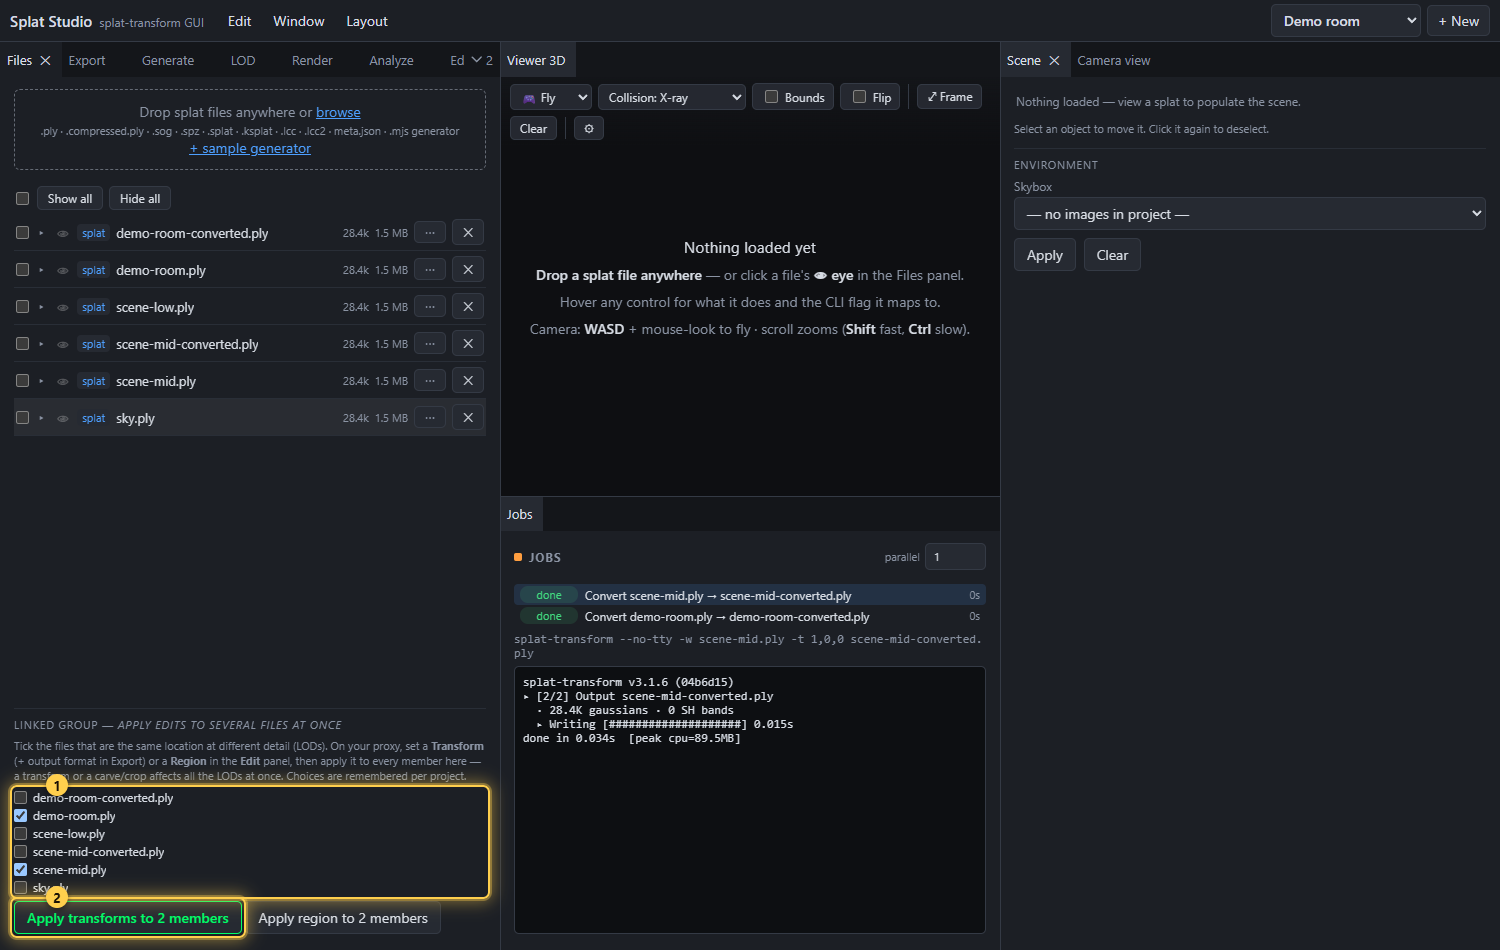
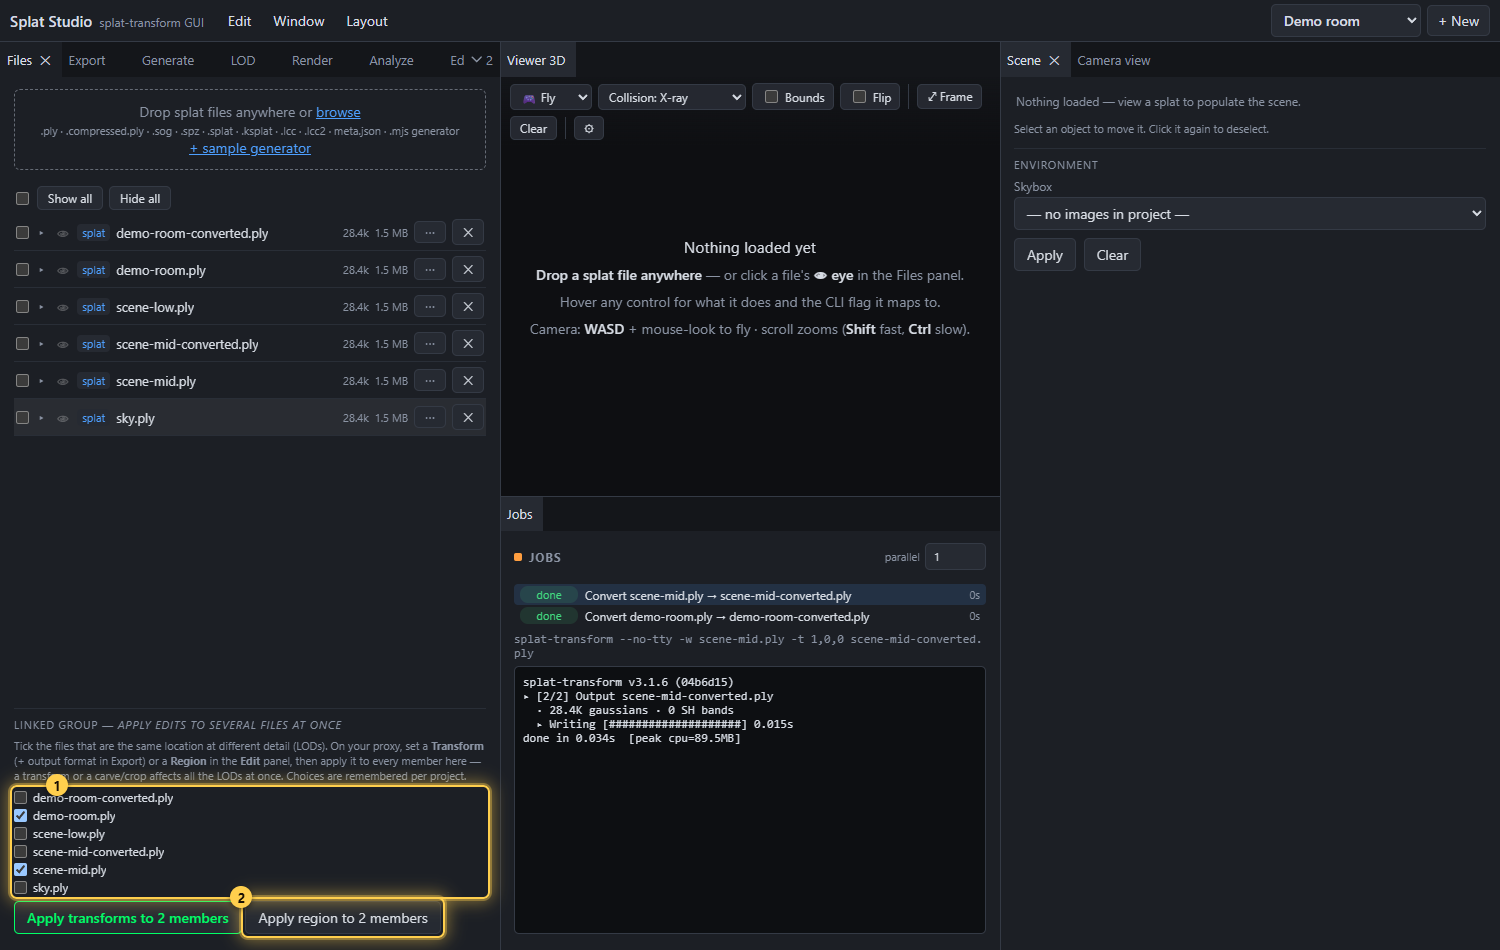
Linked group — edit a proxy, apply to every LOD: the Linked group section at the bottom of the Files panel lets you tick the files that are the same location at different detail (its LODs). Edit the proxy once, then fan that one edit across the whole ladder so it stays consistent. Two actions:
- Apply transforms to members — set the Transform in the Edit panel (plus a splat output format in Export) on your proxy, then click this; every ticked member is converted in turn with the same transform/filter settings.
- Apply region to members — set a Region (carve or crop) in the Edit panel on your proxy, then click this; the same removal or crop is applied to every ticked member, so a region edit on the proxy propagates across all the LODs.
Both run as sequential jobs. Choices are remembered per project; a heads-up appears if the members' extents differ a lot (they may not be the same location).
Export: output formats & filters
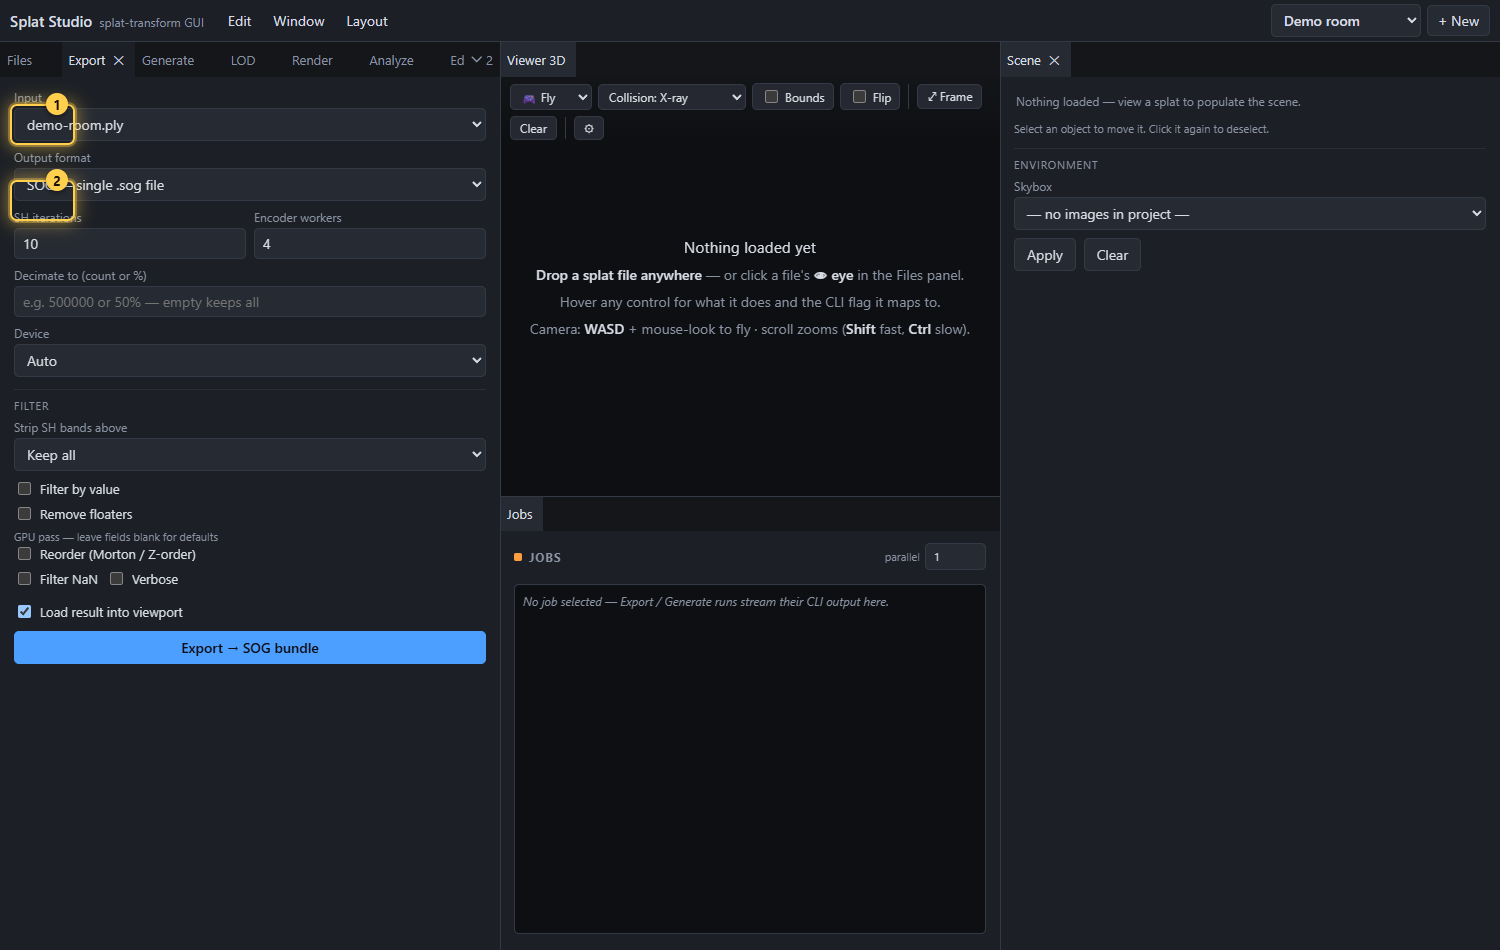
The Export panel produces an output file from a splat — one splat-transform
conversion as a background job. It handles output formats and encode-time
filters; spatial edits (transform, crop/carve) live in the
Edit panel, streamed multi-LOD bakes in
the LOD panel, and image renders in the
Render panel.
- Input — pick any source in the project (including formats the viewer can't
display, like
.spz/.splat/.ksplat/.lcc/.lcc2, and.mjsgenerators). For.lcc/.lcc2or a streamed-LODlod-meta.jsonbundle (including one this app baked in the LOD panel), a LOD levels field appears to read back only a subset of levels (--select-lod, comma-separated, e.g.0,1; empty reads all). - Output format — choose the target:
| Format | Notes |
|---|---|
SOG — single .sog |
Compressed single file (a ZIP of meta.json + WebP textures), ~95% smaller than PLY |
| SOG — unbundled folder | meta.json + WebP textures, for streaming-friendly hosting |
| PLY / Compressed PLY | Standard / SuperSplat-compressed point data |
| SPZ | Niantic SPZ (pick container version 3 or 4) |
| GLB | glTF binary with KHR_gaussian_splatting |
| CSV | Raw gaussian data for analysis |
| HTML viewer | Self-contained viewer page with the splat embedded |
- Set format-specific options as they appear. For SOG-backed outputs that's a
paired SH iterations / Encoder workers row — iterations trade quality
for speed, while Encoder workers (
--max-workers) only changes encode speed, not the output (0= serial). Other formats surface SPZ version, HTML viewer options, etc. Then click Export. The job lands in the Jobs panel — click it there for its exact CLI command and live output. Jobs queue up and run one at a time by default; the panel's parallel field raises how many may run at once (keep it at 1 for GPU-heavy jobs like collision), and ✕ on a row cancels a queued or running job. With Load result into viewport checked (default), any viewable result loads automatically when the job finishes.
Generate: procedural .mjs generators
The Generate tab runs a procedural .mjs generator — a script that creates
gaussians from parameters instead of a scan (creation, not export, which is why it
has its own tab).
- Generator — pick a
.mjsfile in the project (+ sample generator in Files drops one in). - Params — a freeform
key=valfield, or live sliders if the generator advertises aparamsschema (drag and release to regenerate). - ✨ Generate & view — writes a
.plyinto the project and loads it straight into the viewport.
To export a generator to another format, pick the .mjs as the Export input —
the Generate tab's params apply to that run too.
Filters
The Filter section applies encode-time filters to the splat before it's written. They run in a fixed pipeline order (and don't apply to streamed-LOD bakes):
- Strip SH bands above — drop spherical-harmonic bands to shrink the file
(
-H, e.g. keep only band 0 for flat color). - Filter by value — keep/drop by a property comparison (
-V); pick the property, comparator, and threshold. - Remove floaters — strip disconnected specks (
--filter-floaters); a GPU pass with optional voxel size / opacity / min-contribution overrides. - Reorder (Morton / Z-order) — spatially sort for better compression (
--morton-order). - Decimate to (count or %) — reduce the gaussian count to a number or percentage
(
--decimate). - Filter NaN — drop non-finite gaussians (
-N). - Verbose — print memory/timing diagnostics in the job log (
--verbose --memory).
LOD: streamed multi-LOD
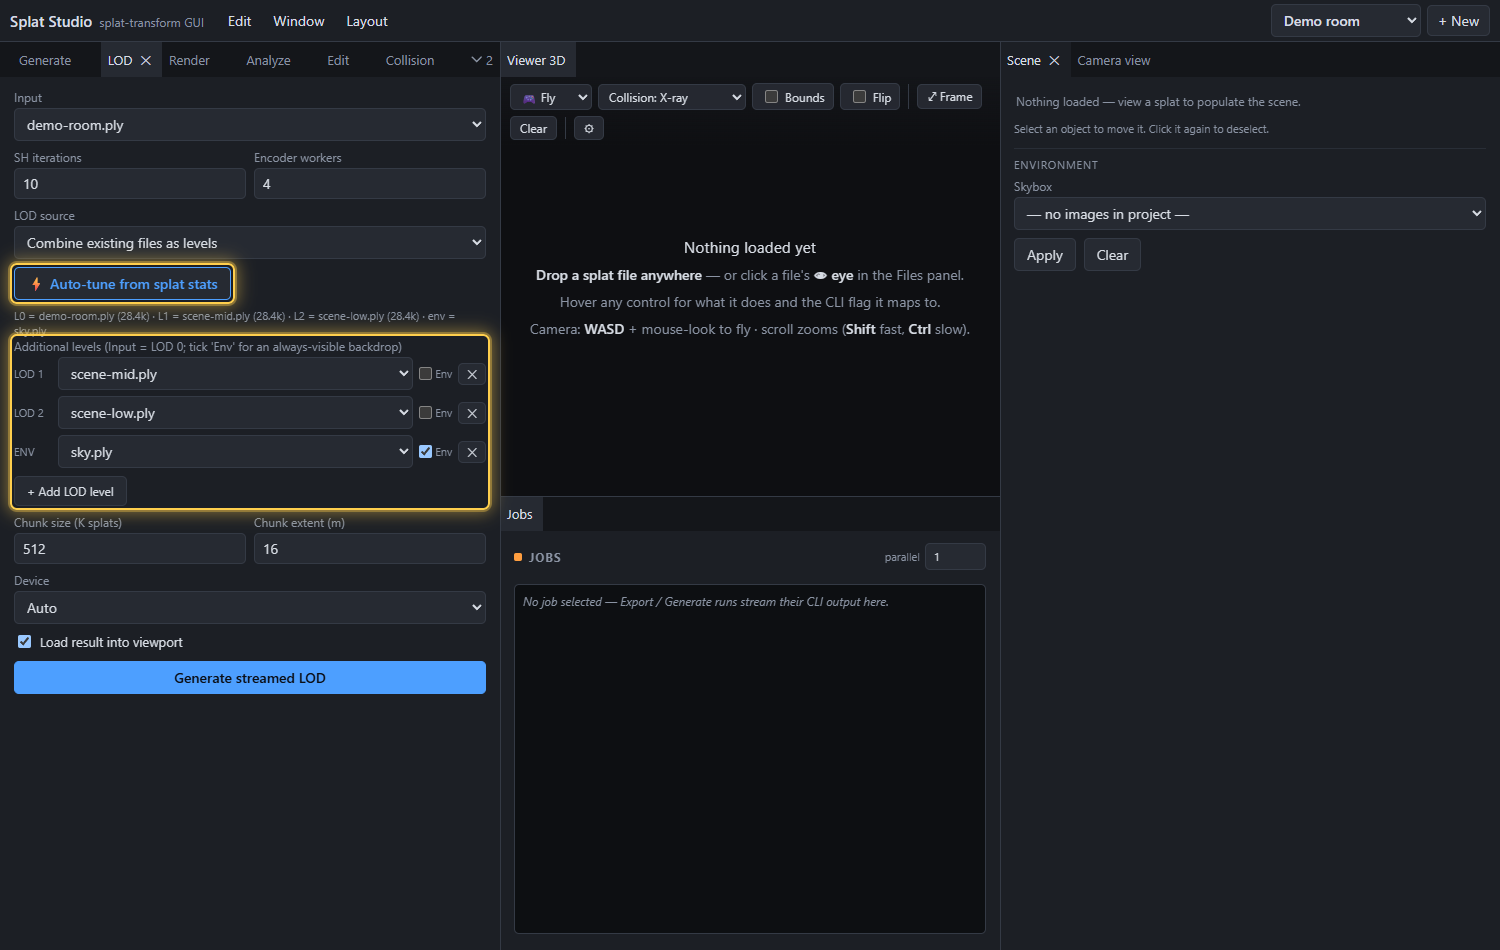
The LOD panel bakes a streamed multi-LOD SOG — a lod-meta.json plus per-LOD chunk
folders that the engine streams by camera distance, for scenes too big to load at once.
- Input — the highest-detail source (LOD 0).
- Set the paired SH iterations / Encoder workers row (as in Export).
- LOD source — Decimate input automatically derives the lighter levels from the single input, or Combine existing files as levels uses files you already have (e.g. exports at different gaussian counts) as explicit levels.
- In Decimate mode, set LOD levels and Keep per level (%). In Combine mode,
each Additional level row is the next, lighter level — order matters (each level
should have fewer gaussians than the one before). Tick a row's Env box to make
that file an always-visible far/background shell (a coarse, decimated backdrop —
skybox, distant cityscape — emitted as LOD
-1) the runtime keeps resident instead of culling it by distance. One environment layer per bake; Combine mode only. - Set the Chunk size (K splats) and Chunk extent (m), pick a Device, then Generate streamed LOD.
Every bake also writes a build-meta.json next to the bundle's lod-meta.json — the
recipe it was built from: the source file per level, the environment selection, the
effective settings, and per-level gaussian counts. Expand the bundle's row in the Files
panel (its ▸ chevron, or Details in the ⋯ menu) to read the recipe inline
(bundles baked before this file existed report "No build recipe").
⚡ Auto-tune from splat stats: the Auto-tune button reads each source's gaussian count and world-space extents (a quick CPU summary, cached) and fills the settings for you:
- Decimate mode — derives the number of LOD levels and chunk extent from the input's count and scene size (aiming the coarsest level near ~150k gaussians).
- Combine mode — orders the level rows by gaussian count (most detail first → LOD 1, 2, …) and tags a backdrop (much larger extents, or an
env/sky-ish name) as the Env layer. Warns if a level has more gaussians than the Input (LOD 0).A one-line plan summarises what it chose; every value stays editable afterwards.
Render: WebP image
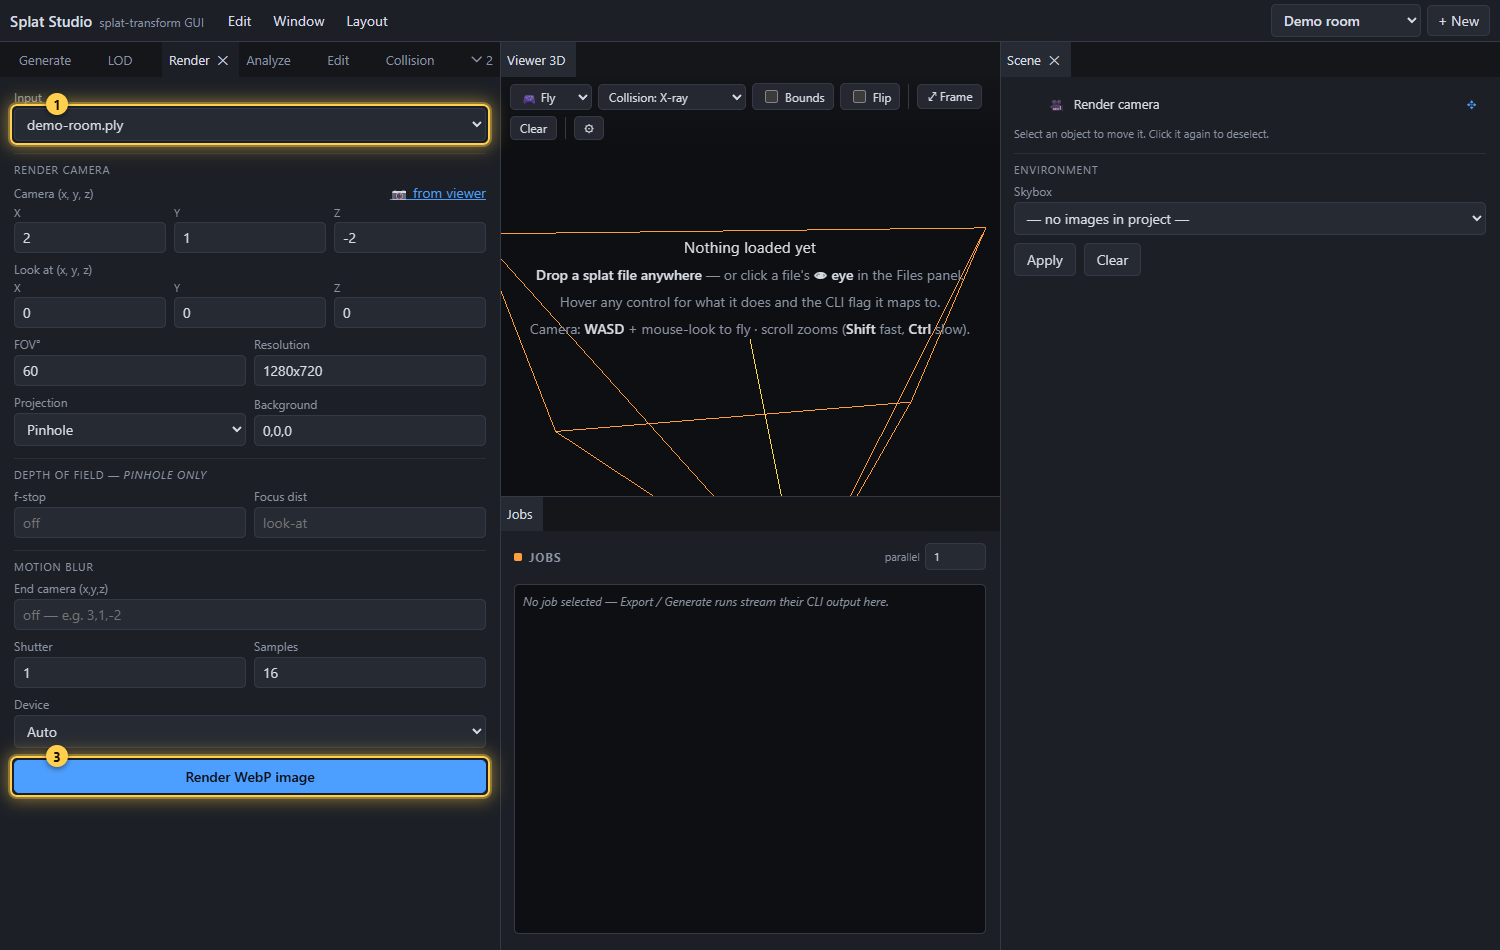
The Render panel GPU-renders a lossless WebP image of the splat through the rasterizer.
- Pick the Input splat.
- Set the per-axis Camera and Look at fields — or click 📷 from viewer to copy the current viewport camera as a starting point, then fine-tune by dragging the Render camera gizmo (select it in the Scene panel).
- Set FOV°, Resolution, Projection (pinhole or equirect 360°), and a Background color.
- Optionally add Depth of field (f-stop + focus distance, pinhole only) and Motion blur (an end camera pose + shutter / sample count).
- Pick the Device and click Render WebP image.
The render camera is also previewed as a frustum gizmo in the viewport (and live in the Camera view tab) so you can see exactly what it will capture.
Analyze: summary statistics
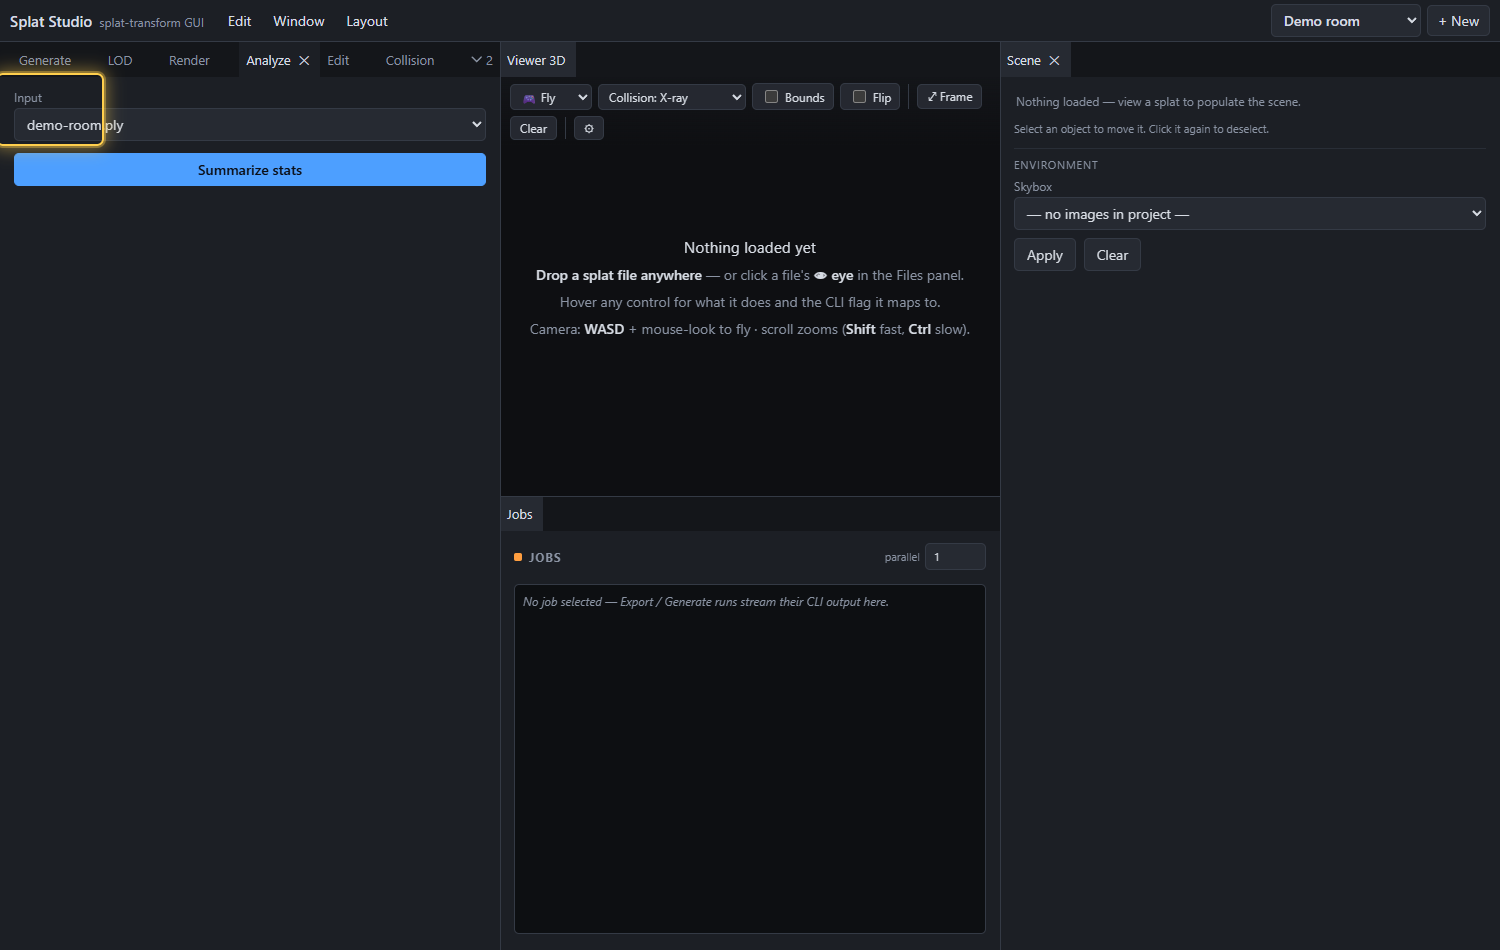
Analyze prints per-column statistics without writing any file (--stats).
- Pick an Input and click Summarize stats.
- The result renders below and persists: summary tiles (gaussian count, SH
bands, etc.) and a table of per-column
min · max · median · mean · stdDevwith NaN/Inf counts. - copy puts the raw Markdown summary on the clipboard.
Use it to sanity-check a splat before converting — spot NaNs, extreme extents from floaters, or unexpected SH bands.
Edit: transform, measure & region
The Edit panel hosts the spatial edits — transform, measure-to-scale, set origin, and region trim. Each writes a new edited splat and loads it; the source is untouched. Most tools are viewport-driven: you place points by clicking the splat, and points snap to the surface and hide behind it as you orbit (no collision mesh needed).
Transform
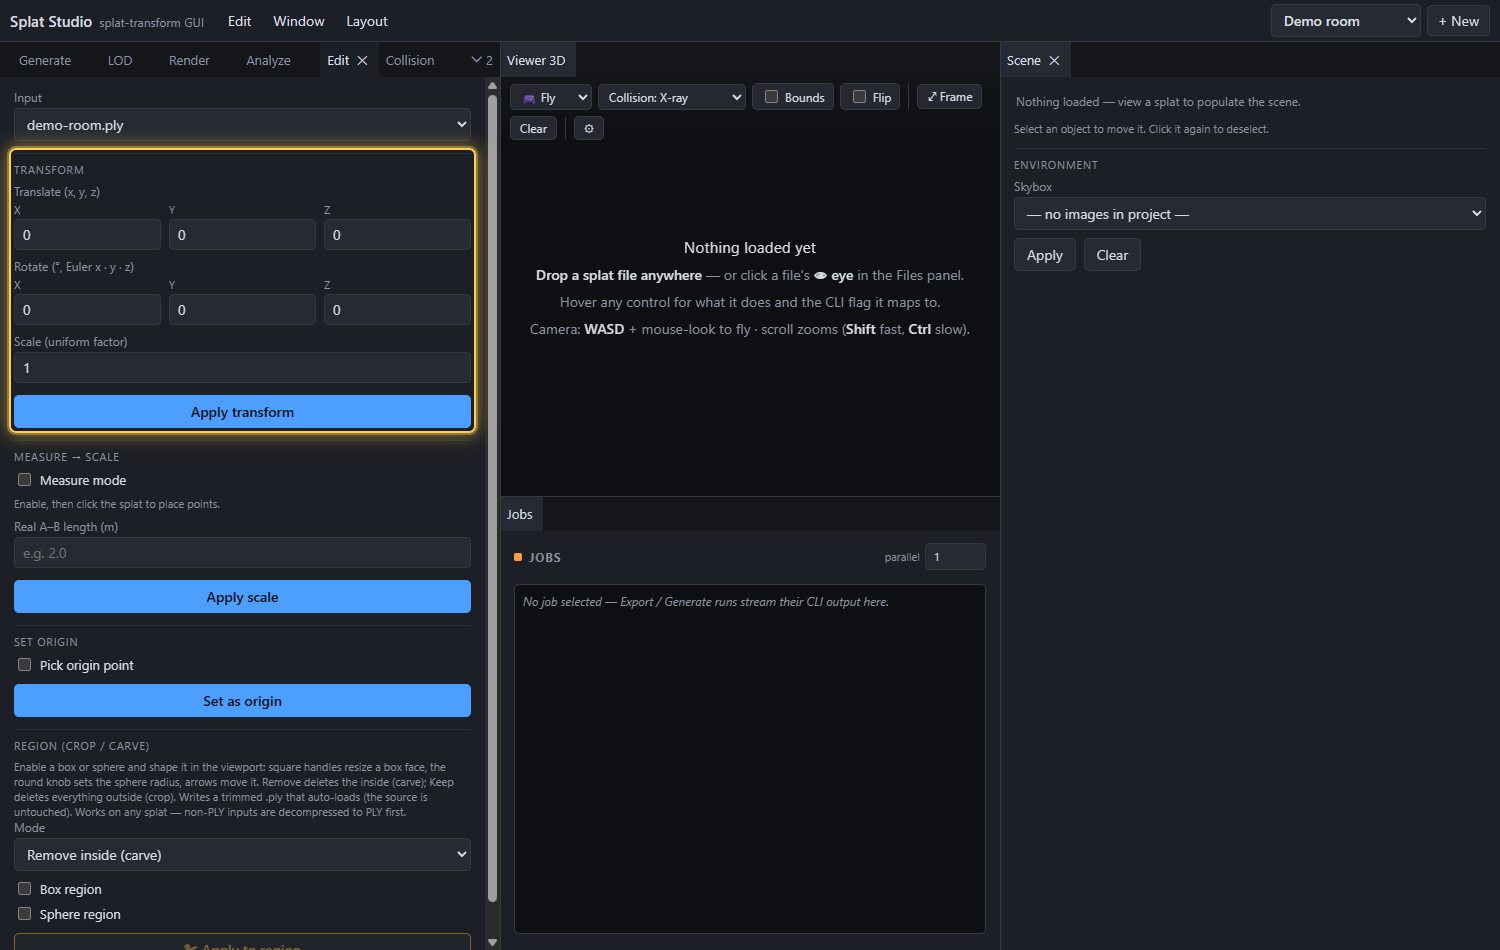
Apply a fixed translate / rotate / scale to the splat before writing:
- Translate (x, y, z) — move every gaussian (
-t), insplat-transformworld units. - Rotate (°, Euler x · y · z) — rotate by Euler angles in degrees (
-r). - Scale (uniform factor) — uniformly scale (
-s);1= no change,0.5= half,2= double.
Click Apply transform to write a new edited .ply that auto-loads.
Measure → scale
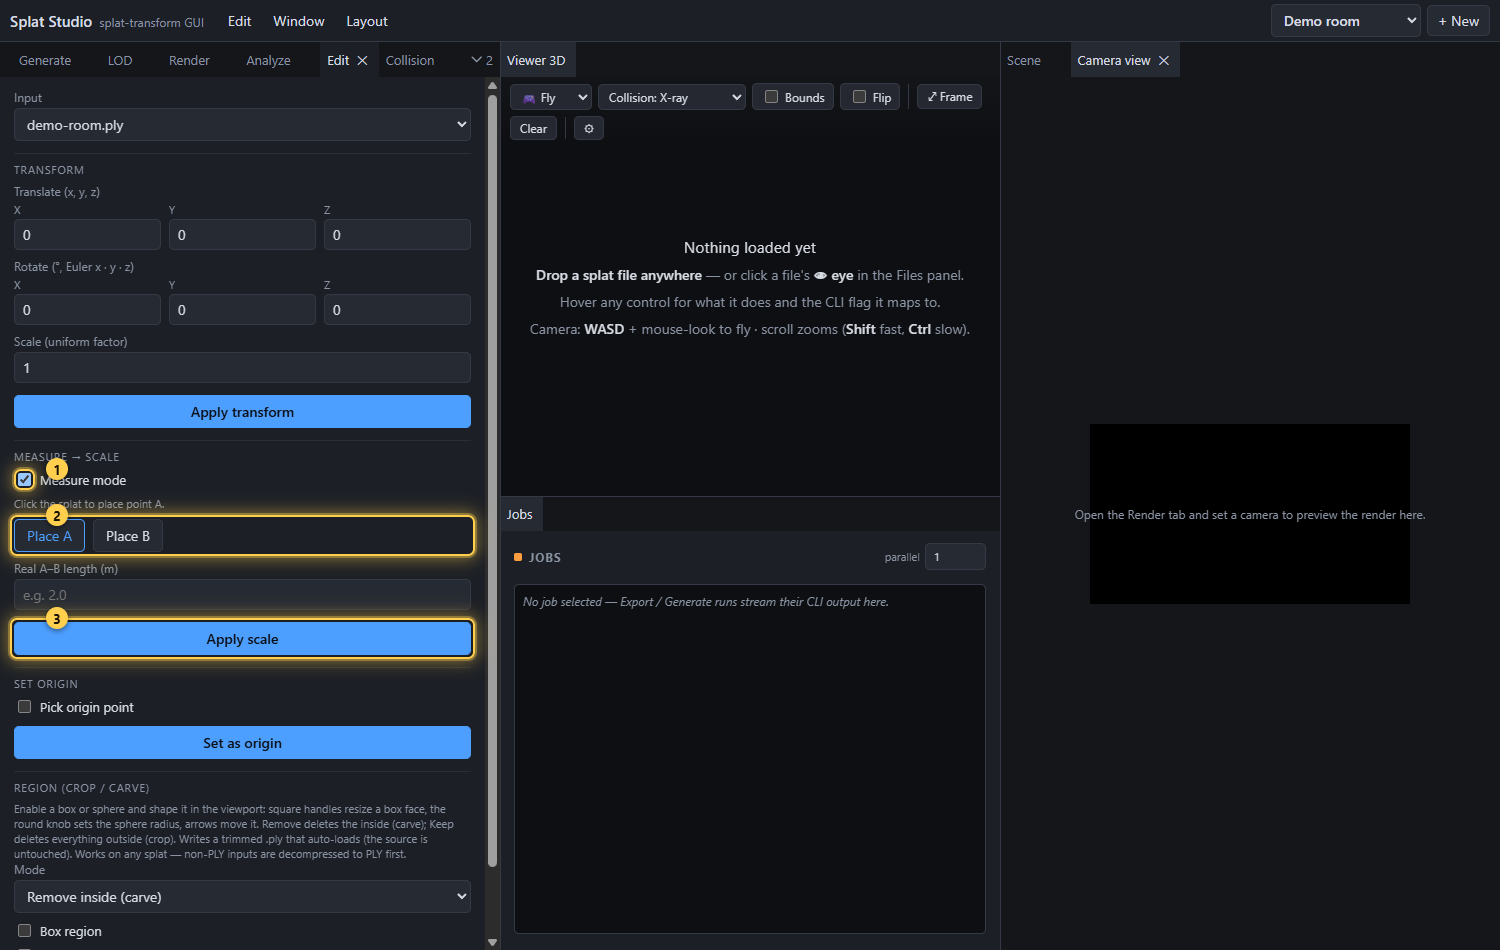
The measure tool turns the viewport into a measuring/aligning tool — like SuperSplat,
but local and driven by splat-transform.
Measure → real-world scale:
- Pick the splat in Input (and show it with its eye so you can see it).
- Check Measure mode.
- Click the splat to drop point A (green), then click again for point B (orange) across a feature whose real size you know. Place A / Place B choose which point the next click sets, so you can nudge just one.
- Enter the Real A–B length in meters. The readout shows the resulting scale factor.
- Click Apply scale — Splat Studio writes a new, correctly-scaled splat (
-s) and loads it.
Set origin
Check Pick origin point, click the splat where (0,0,0) should be, then Set as
origin to recenter the splat (-t).
Region (crop / carve)
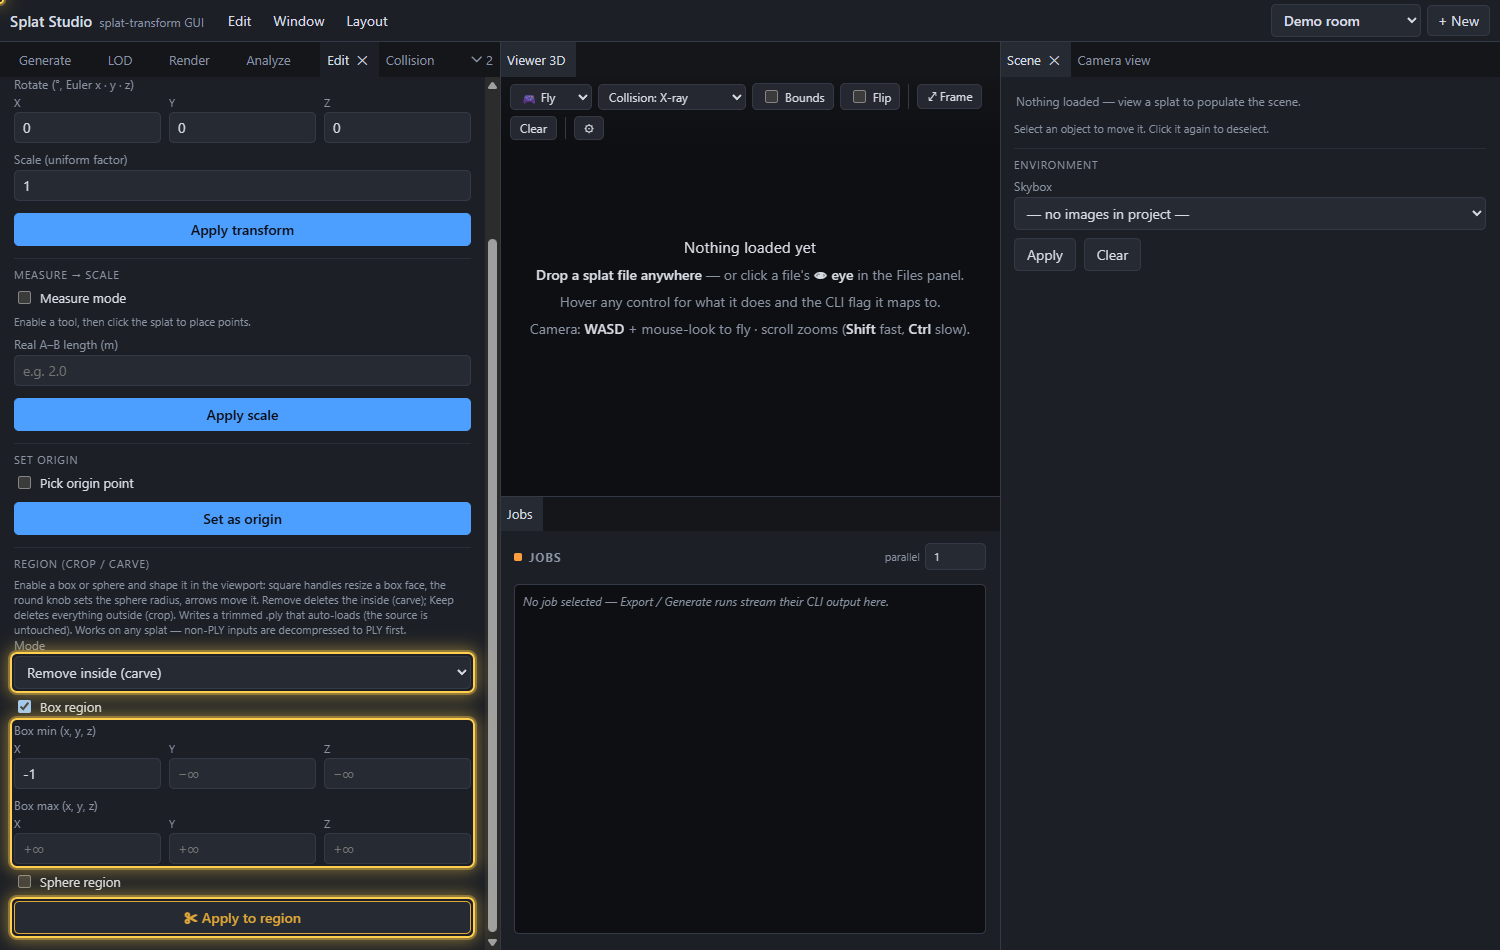
Trim the splat to (or away from) a box or sphere. A Mode dropdown picks what ✂ Apply to region does:
- Remove inside (carve) — deletes the gaussians inside the box/sphere.
- Keep inside (crop) — deletes everything outside, keeping only the inside.
Enable Box region and/or Sphere region and shape it in the viewport: drag a
square face handle to resize one side of the box (the opposite face stays pinned —
and only that side's field is filled in, so blank/unbounded sides stay unbounded), drag
the round knob on the sphere's edge to set its radius, and drag the arrows to
move the whole shape. A live readout shows how many gaussians the trim will remove;
then ✂ Apply to region. It writes a new trimmed .ply that auto-loads; the source
is untouched. splat-transform's -B/-S can only keep inside, so this runs a
local trim.
It works on any single-file splat, not just PLY: non-PLY inputs
(.sog/.spz/.splat/.ksplat/.lcc) are decompressed to a temp PLY via the CLI
first, then trimmed. The output is always a .ply.
Collision: voxels & mesh
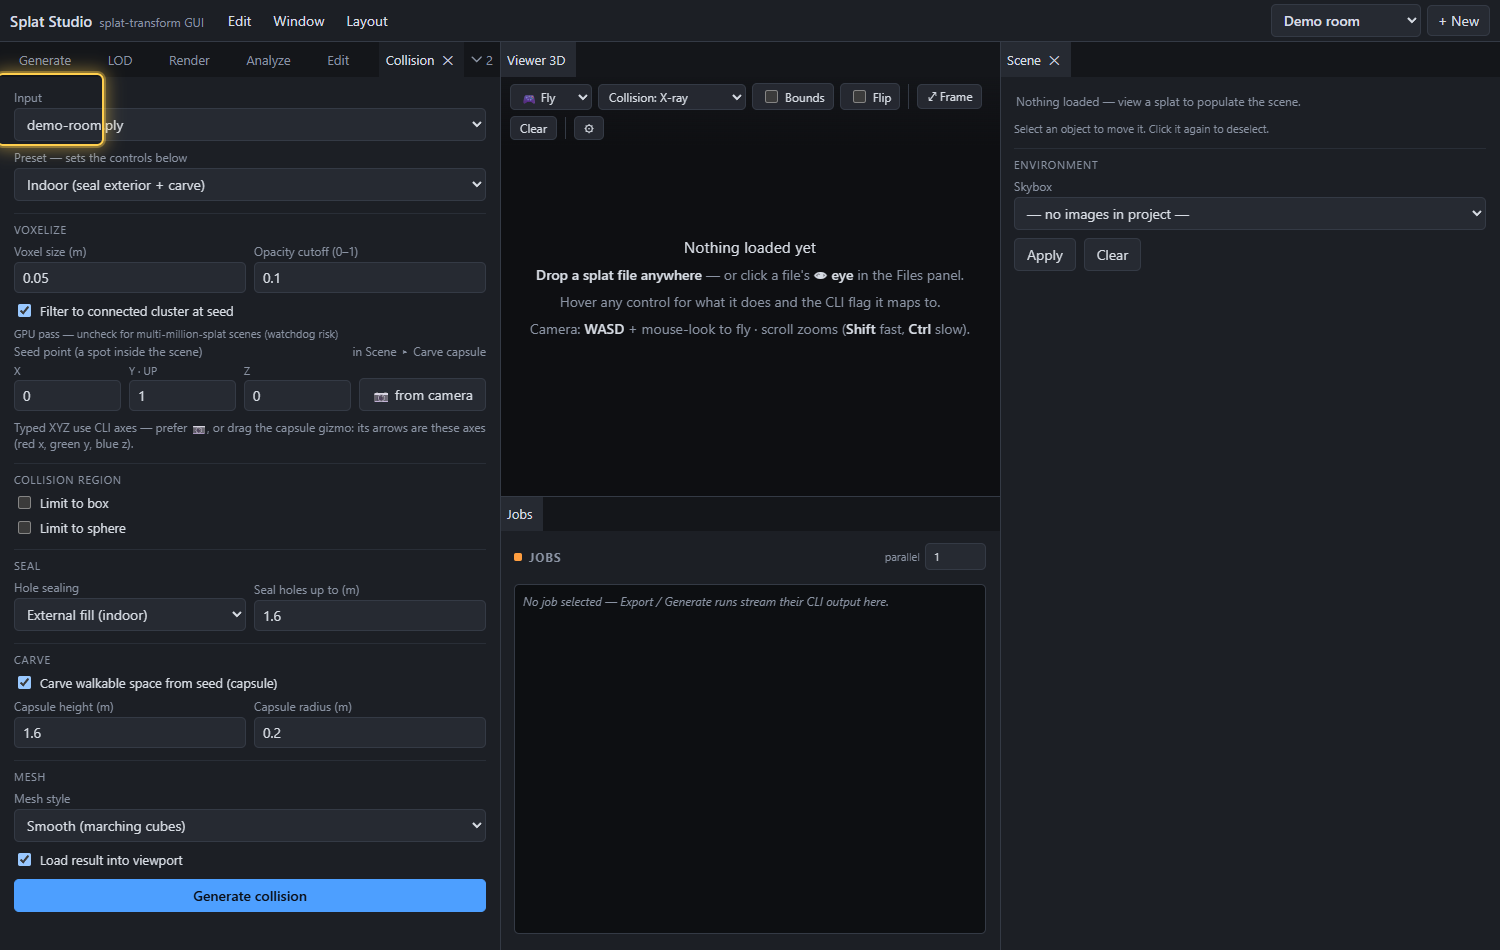
Generate a runtime collision mesh (.collision.glb) and sparse voxel octree
(.voxel.json/.bin) from a splat.
- Input — the source splat.
- Preset — a one-click starting point that fills in the controls below:
- Indoor — seal the model from outside air, then carve the walkable interior.
- Outdoor — fill each column up from the bottom so terrain is solid.
- Object — plain voxelization, no sealing or carving. Editing any control switches the preset to Custom.
- Voxelize — set the voxel size (edge length, e.g. 0.05 m) and opacity cutoff (ignore wispy gaussians).
- Seed point — a spot inside the scene used by sealing, carving and the cluster filter. Type XYZ, or fly inside with WASD and click 📷 from camera (recommended — typed axes are CLI-space, rotated 180° from the viewer). To see and drag the seed in the viewport, select Carve capsule in the Scene panel.
- Collision region (optional) — limit generation to part of a large scene.
Tick Limit to box to crop the splat to an axis-aligned box (everything outside
is ignored before voxelizing). An amber box appears in the viewport: drag a square
face handle to resize (the opposite face stays put) or the arrows to move the
whole box — no mode switching. The corner fields and the box stay in sync, so you
can also type exact extents. Limit to sphere crops to a sphere instead — drag
the round knob on its edge to set the radius, the arrows to move the centre.
Region face shading tints the region's faces so you can see exactly where it
cuts through the splat (0 = wireframe only). This is the fix when a big scene at a
fine voxel size hits the
marching-cubes vertex limit (
RangeError: Map maximum size exceeded): cropping shrinks the mesh surface. A risk chip estimates the overflow risk and offers one-click Coarsen voxel / Shrink to seed; Generate asks for confirmation when the risk is high. - Seal — choose hole sealing (external fill for interiors, floor fill for terrain, or none) and the distance to seal over.
- Carve — flood-fill walkable space from the seed with a player-sized capsule (height/radius). Select Carve capsule in the Scene panel to preview it in cyan and size it against the splat. Essential after external fill.
- Mesh style — smooth (marching cubes) or exact voxel faces — then Generate collision. With Load result into viewport checked (default), the outputs load as a wireframe + voxel overlay when the job finishes.
The cluster filter (keep only the splats connected to the seed) is GPU-only and can trip the Windows GPU watchdog on multi-million-gaussian scenes — uncheck it for very large scans.
Viewport toolbar & Settings
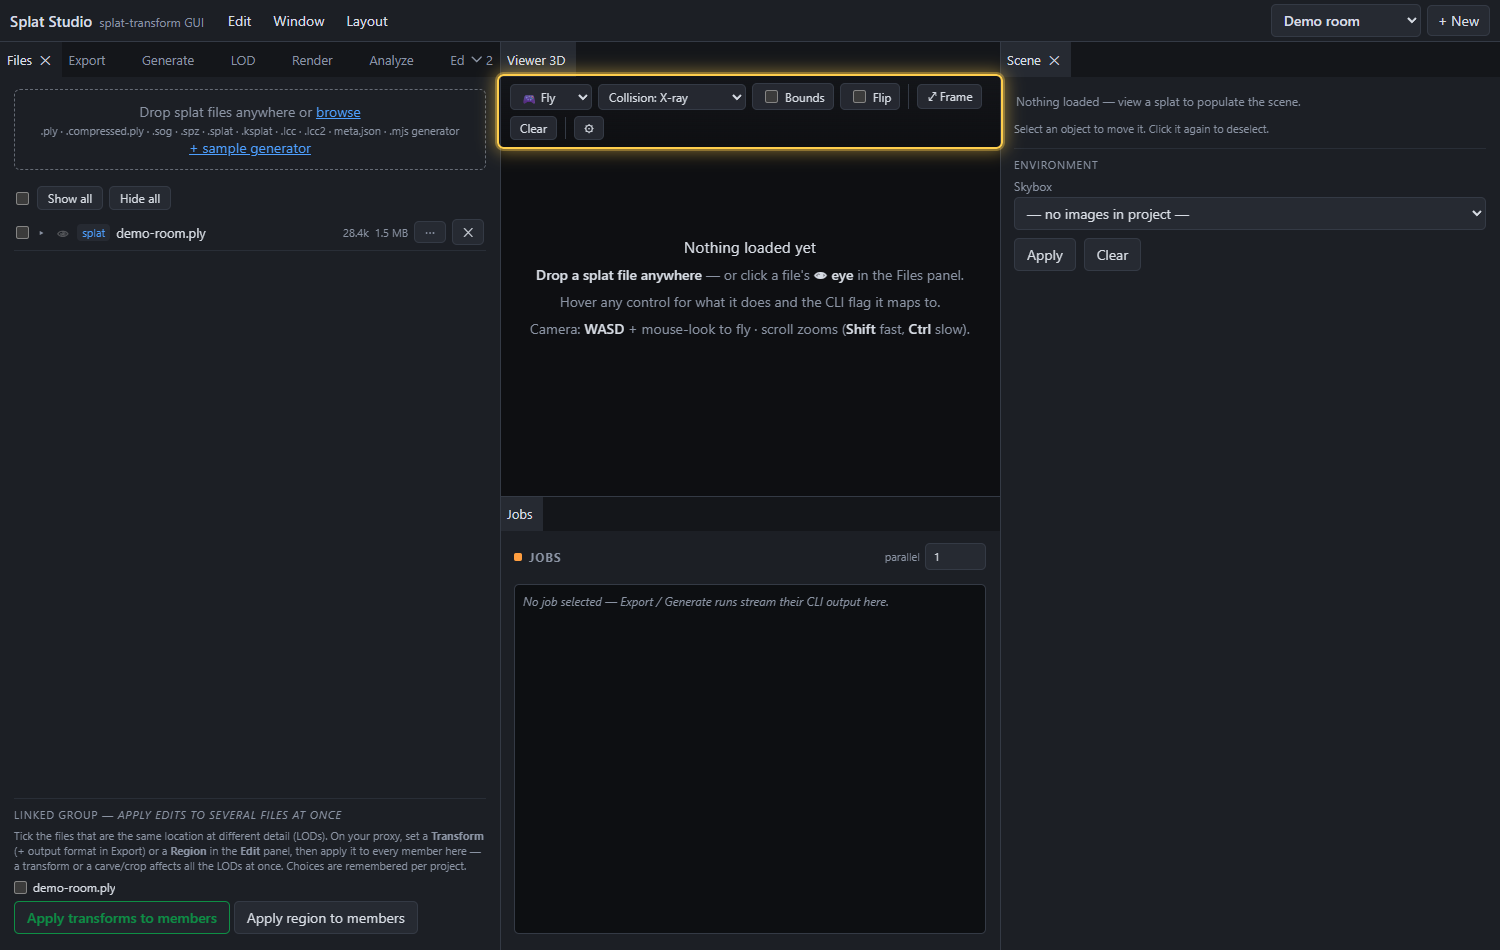
Display controls live in a toolbar along the top of the Viewer 3D window:
- Camera control — Fly (default): mouse-look + WASD to move, ideal for inspecting carved interiors. Orbit: drag to rotate around the focus point; middle- or Shift-drag pans. Scroll zooms in both modes.
- Collision style — X-ray (all edges through everything, for small meshes), Hidden-line (front edges only, for dense meshes), or Solid + edges (lit translucent surface — best for checking placement and inspecting carved interiors).
- Bounds — draws the splat's axis-aligned bounding box (floaters stretch it — a quick outlier check). Flip — for collision meshes from other tools already in viewer/engine space (splat-transform output is aligned automatically).
- Frame — re-fit the camera. Clear — unload everything and free GPU memory.
- ⚙ — opens the Settings dialog (also under Window ▸ Settings…).
Layer visibility (splat / collision / voxels) is toggled per-object with the 👁 eye buttons in the Scene panel.
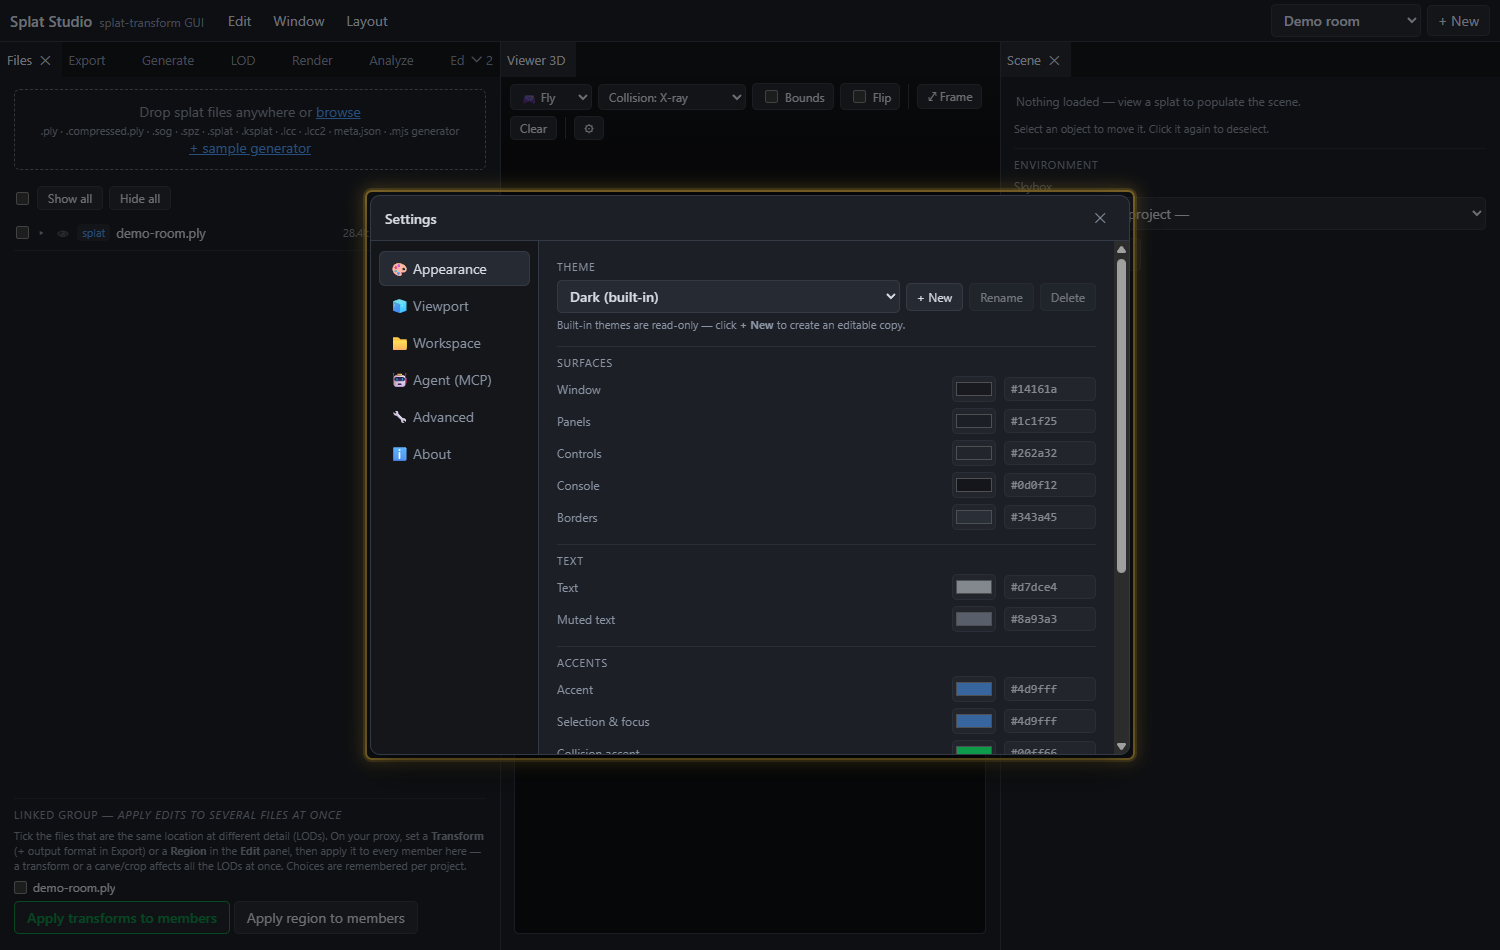
Settings opens as a dialog with sections down the left:
- Appearance — the app theme. Dark and Light are built in; + New copies the selected theme into an editable one where every color is configurable live — surfaces, text, the accent, the selection/focus color, the panel hues and the status colors — each with a color picker + hex field. Custom themes can be renamed, deleted, or reset to their base palette, and everything is remembered between sessions.
- Viewport — the wire / voxel colors & opacity for the 3D overlays.
- Workspace — the folder whose subfolders are your projects.
- Agent (MCP) — agent control of the live editor (below).
- Advanced — a scratch directory for large decimations (
--scratch-dir): where decimation spills temp files on very large scenes. Blank (the default) spills alongside the output; point it at another drive only if the output drive is low on space. Applies to Export Decimate runs and the decimated levels of Streamed LOD. - About — component versions.
Agent (MCP) holds a single toggle that lets a connected AI agent drive the live editor through Splat Studio's MCP server. It's off by default, loopback-only, and revocable instantly (and it resets to off when you switch workspaces); the headless pipeline tools work regardless. See docs/MCP_SETUP.md for the full setup and docs/MCP_WORKFLOWS.md for step-by-step agent workflow tutorials.
Scene hierarchy
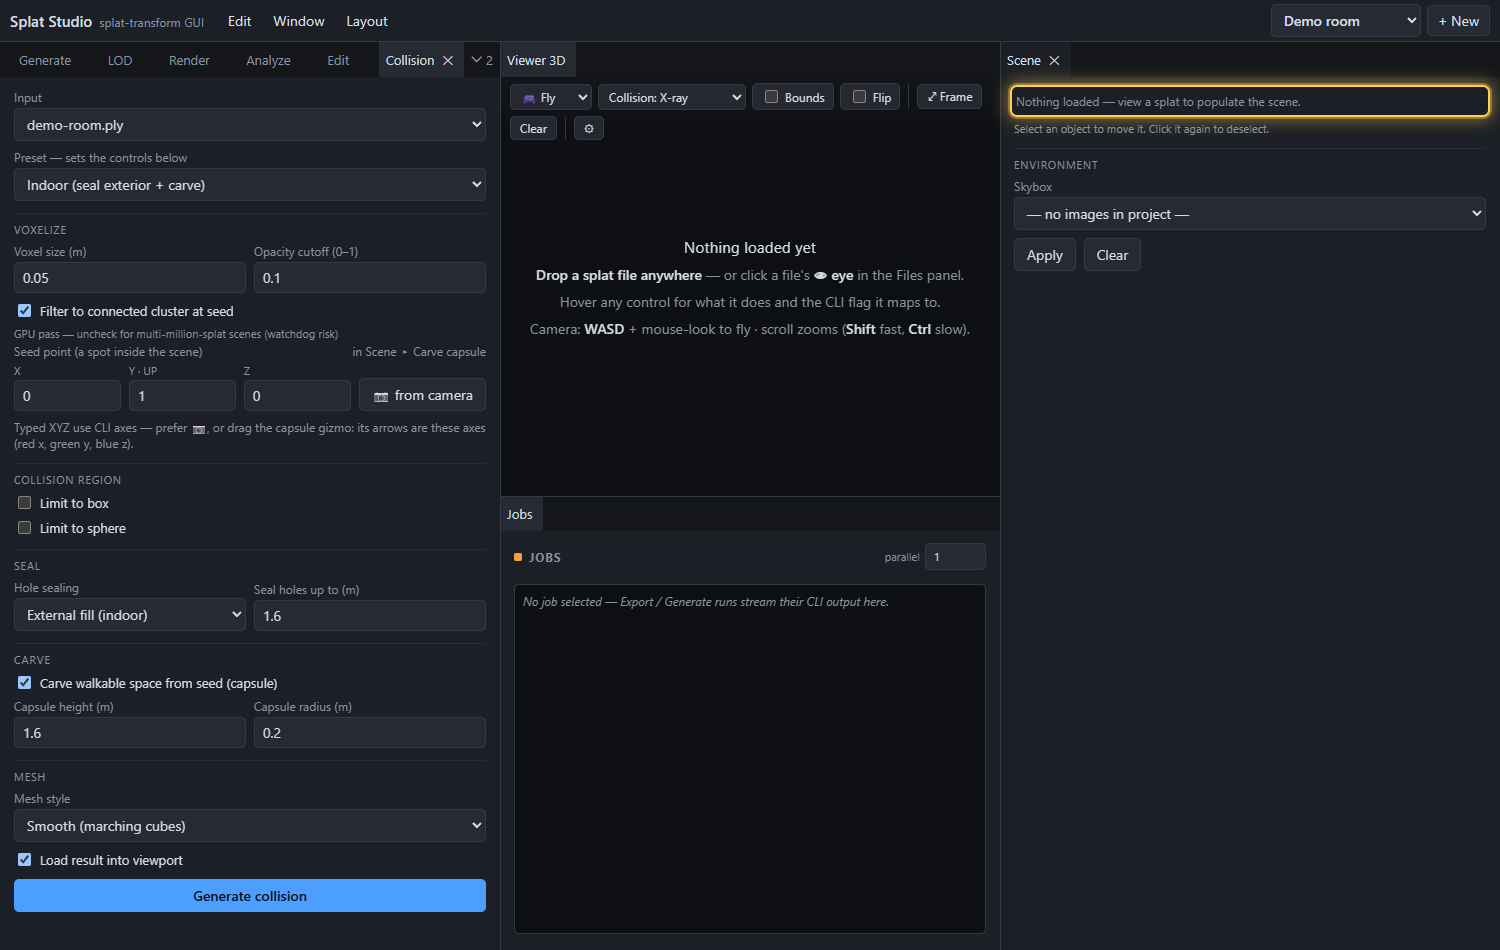
The Scene panel lists the objects currently in the viewport and lets you select one to move it with a gizmo — selecting nothing shows no gizmo. Each layer has a 👁 eye button to show/hide it.
- Splat / Collision mesh / Voxels — appear once loaded; the 👁 toggles visibility, and selecting them just clears any active gizmo.
- Carve capsule (✥) — shows up only while you're actively setting up collision carving (the Collision tab is active and Carve is on). Select it to show the seed marker + carve capsule and a translate gizmo; drag to position the collision seed (the Collision panel's seed XYZ update live). Leaving the Collision tab or turning off carve removes it (and clears the selection).
- Render camera (✥) — appears only while a WebP render is set up. Select it to move the render camera with a gizmo; the Move / Rotate toggle switches between a translate and a rotate gizmo — dragging updates the WebP Camera / Look-at fields, the frustum preview follows, and the Camera view updates live.
Environment / skybox: at the bottom of the panel, pick an equirectangular panorama
image (.webp/.jpg/.png/.hdr) from the project and click Apply to use it as the
scene skybox; Clear removes it.
Camera view
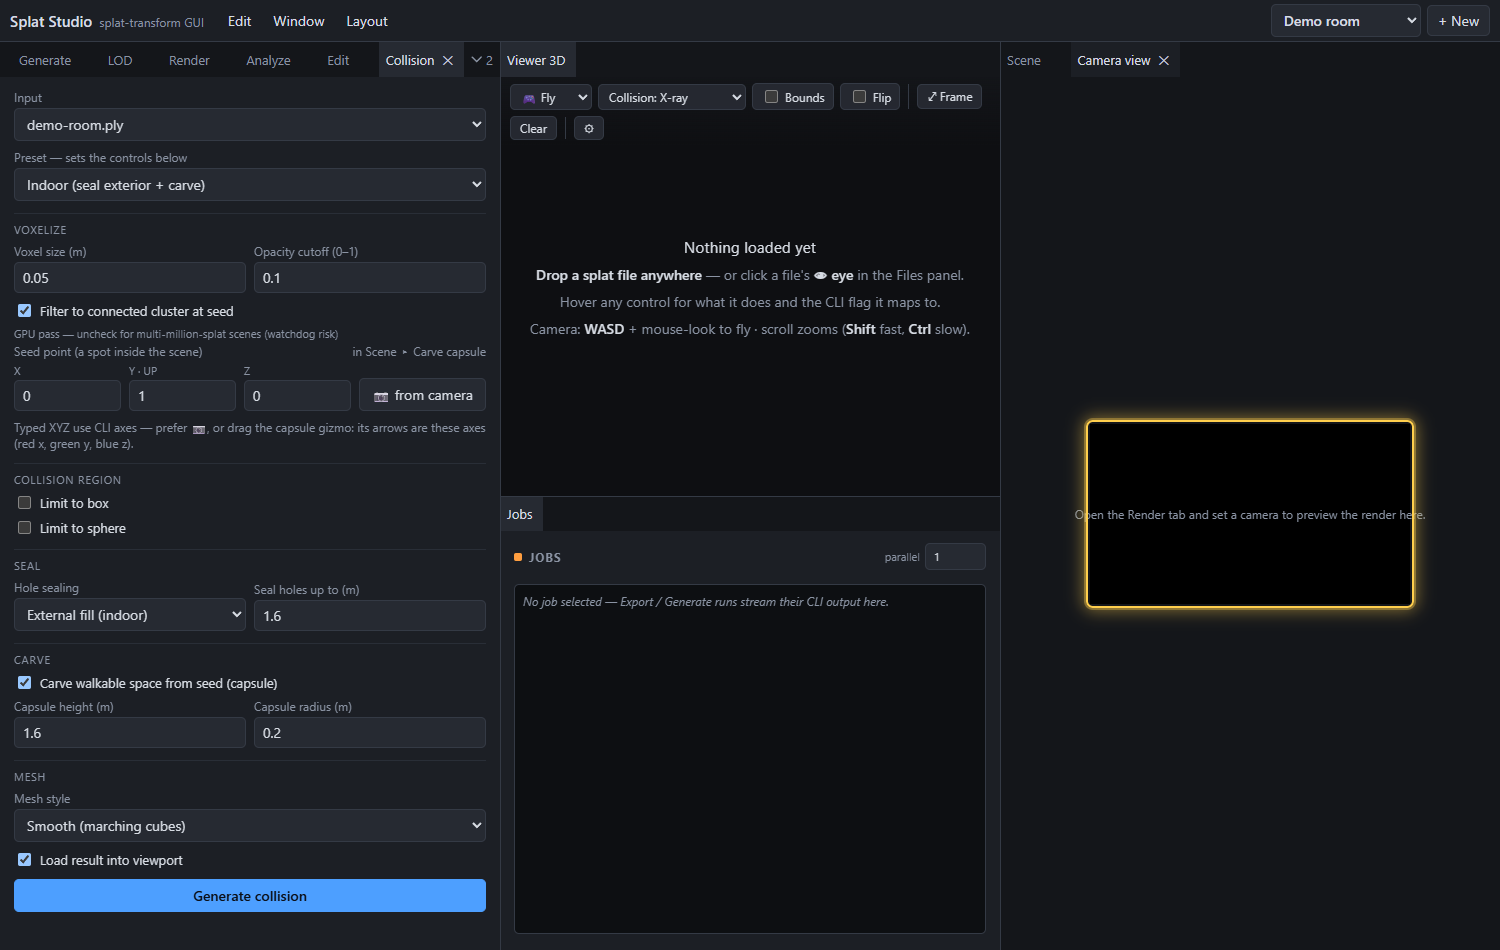
Open Camera view from the Window menu to see a live preview of exactly what the WebP render camera sees — rendered from a second camera, so it shows the splat without the gizmos/frustum/markers. It's a normal dock tab: drag it anywhere, resize it, or float it. Move the render camera (via its gizmo or the WebP fields) and the preview follows. It's only active in WebP image output mode (otherwise it shows a hint); closing the tab frees its GPU memory.
The 3D viewport
- Fly (default) — mouse-look + WASD · Orbit (toolbar) — left-drag · Pan — middle-drag (orbit) · Zoom — scroll (Shift fast, Ctrl slow).
- The chips at the top-left show what's currently displayed (splat / collision / voxels); each ✕ removes that layer.
- Drag the borders between dock tabs to resize, or drag a tab to re-dock or float it. Closed a tab by accident? Reopen it from the Window menu.
Coordinate notes
- The viewer renders splats with the usual 180°-about-X flip of raw (Y-down) 3DGS data. Edit-panel measurements are in real viewer/world units.
splat-transform's voxel/collision pipeline uses a different up-axis convention, so typed seed/translate coordinates are in CLI space (rotated 180° about Y from the viewer). Prefer 📷 from camera / clicking the splat, which convert for you.- Gizmo arrows show the typed axes. The seed, crop, and collision-region gizmos run in local space, so their arrows point along the same axes as the panel fields: red = x, green = y, blue = z. If you're ever unsure which way a typed value moves something, look at the arrows.
Updates
Every push to the project's main branch builds a new Windows release (installer +
portable exe) and publishes it to
GitHub Releases. See
AUTOMATION.md for the release pipeline.
The installed app updates itself: on launch (and every few hours) it checks for a newer release. With Download updates automatically on (Settings ▸ Updates, the default), a found update starts downloading right away; turned off, the status pill in the bottom-right corner (and the settings page) show a Download button instead. The pill tracks the whole flow — checking, download progress, "restart to update" — and clicking it opens Settings ▸ Updates. Downloads run in the background (progress also shows on the taskbar icon); when ready the app offers to restart and install, or installs automatically the next time you quit. You can trigger a check any time via Help → Check for Updates… or the settings page. (The NSIS installer build self-updates; the standalone portable exe does not.)
Maintaining this guide is automated — see AUTOMATION.md. When the app or its upstreams change, the screenshots and this page are regenerated so they never drift from the shipping UI.